Fullstack Youtube Video Summarizer with Whisper and LLAMA-3
Have you ever found yourself adding video after video to your YouTube “watch later” playlist, only to realize there’s no way you’ll ever have time to actually watch them all? I definitely have. It’s frustrating, because I’m genuinely interested in the content, but I simply don’t have hours to spend viewing every intriguing video I come across.
That’s when I had an idea - what if instead of having to watch a full video, I could get a concise, well-structured summary that captures all the key points and takeaways? That would be a huge time-saver! So I decided to build it myself.
In this post, I’ll walk you through how I created a full-stack YouTube video summarizer using Python, PyTube, Whisper / AssemblyAI, LLAMA-3, and Docker. You can find all the code on my GitHub. Feel free to use it yourself or even suggest improvements!
Solution Design
Basic Solution
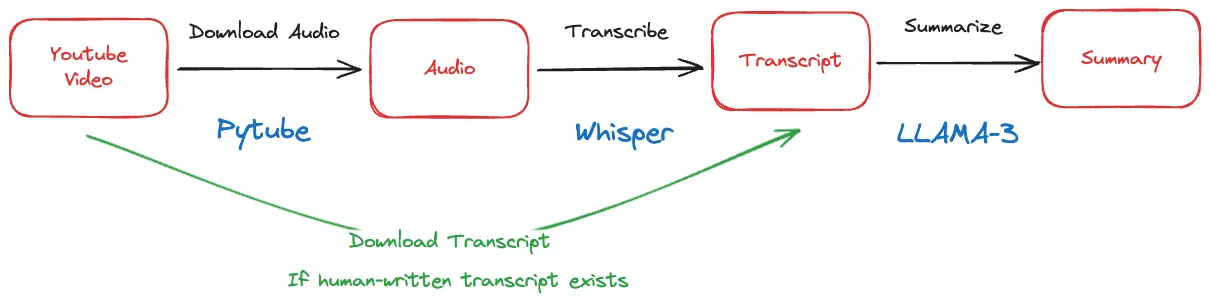
At a high level, here’s how the YouTube summarizer works:
- Download the video from YouTube using the video URL (with PyTube library).
- Transcribe the video’s audio into text using a speech recognition model (Whisper / AssemblyAI).
- Summarize the transcript using a large language model trained for summarization (LLAMA-3).
- Return the summary to the user through a simple web interface.
The solution involves building a backend API to handle the video processing and summarization, along with a minimal frontend interface for the user to input a video URL and view the generated summary.
This is what the basic flow looks like:

This approach works for short videos, but there are a few optimizations we can make to improve performance, especially for longer videos:
- Check for and use manually-created video transcripts if available from YouTube, to skip the audio download and transcription steps.
- Cache transcripts and summaries for popular videos to avoid redundant processing.
- Split long audio/transcripts into chunks to parallelize processing and avoid hitting model input size limits.
Let’s dive deeper into each of these optimization strategies.
Skipping Audio Downloading & Caching Summaries
One straightforward way to speed up our summarization pipeline is to skip the audio download and transcription steps whenever possible. How can we do this? By leveraging pre-existing video transcripts when available.
For example, many YouTube videos have subtitles or closed captions provided by the video creator. If we can directly fetch this transcript, we can bypass the need to download the audio and run it through a speech recognition model ourselves. This shortcut can significantly reduce the processing time for videos with quality subtitles available.
Of course, not all videos have human-created transcripts available. YouTube does automatically generate subtitles, but the quality is often spotty, especially for videos with background noise, accented speech, or multiple speakers. In these cases, running the audio through our chosen speech recognition model is still necessary to get a reliable transcript.
Another key optimization is to cache and reuse results whenever we can. Imagine two users request a summary for the same video. With a naive implementation, we would download the audio, transcribe it, and generate a summary twice - duplicating work and wasting time and compute resources.
A smarter approach is to cache the outputs at each step of the pipeline. Upon receiving a request for a video we’ve already processed, we can skip straight to returning the cached summary. We can also cache intermediate results like transcripts, so that even if we need to re-run the summary step with updated parameters or a new model, we don’t duplicate the transcription work.
Here’s what our updated pipeline looks like with the caching logic added:
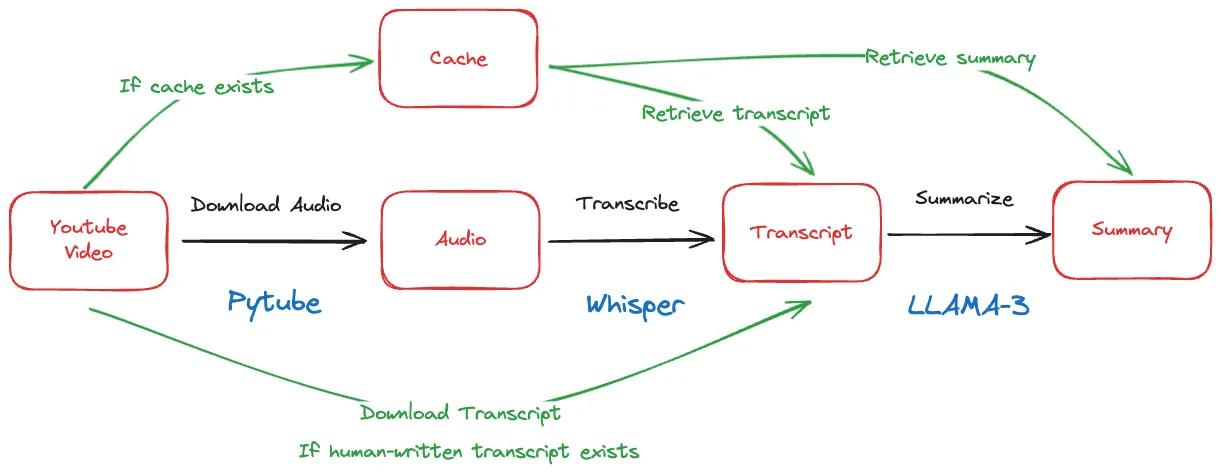
Caching is a common technique in software systems for avoiding redundant work, and it’s especially impactful for pipelines like ours with compute-heavy steps like transcription and summarization. The benefits really shine when you have a popular video that many users are requesting summaries for.
However, caching only helps if you have repeated requests for the same video. If usage of your summarizer tool is sparse - say just used occasionally by your family - chances are low that you’ll get multiple requests for the same videos. In this case, we need to focus on speeding up the core one-time summarization flow as much as possible.
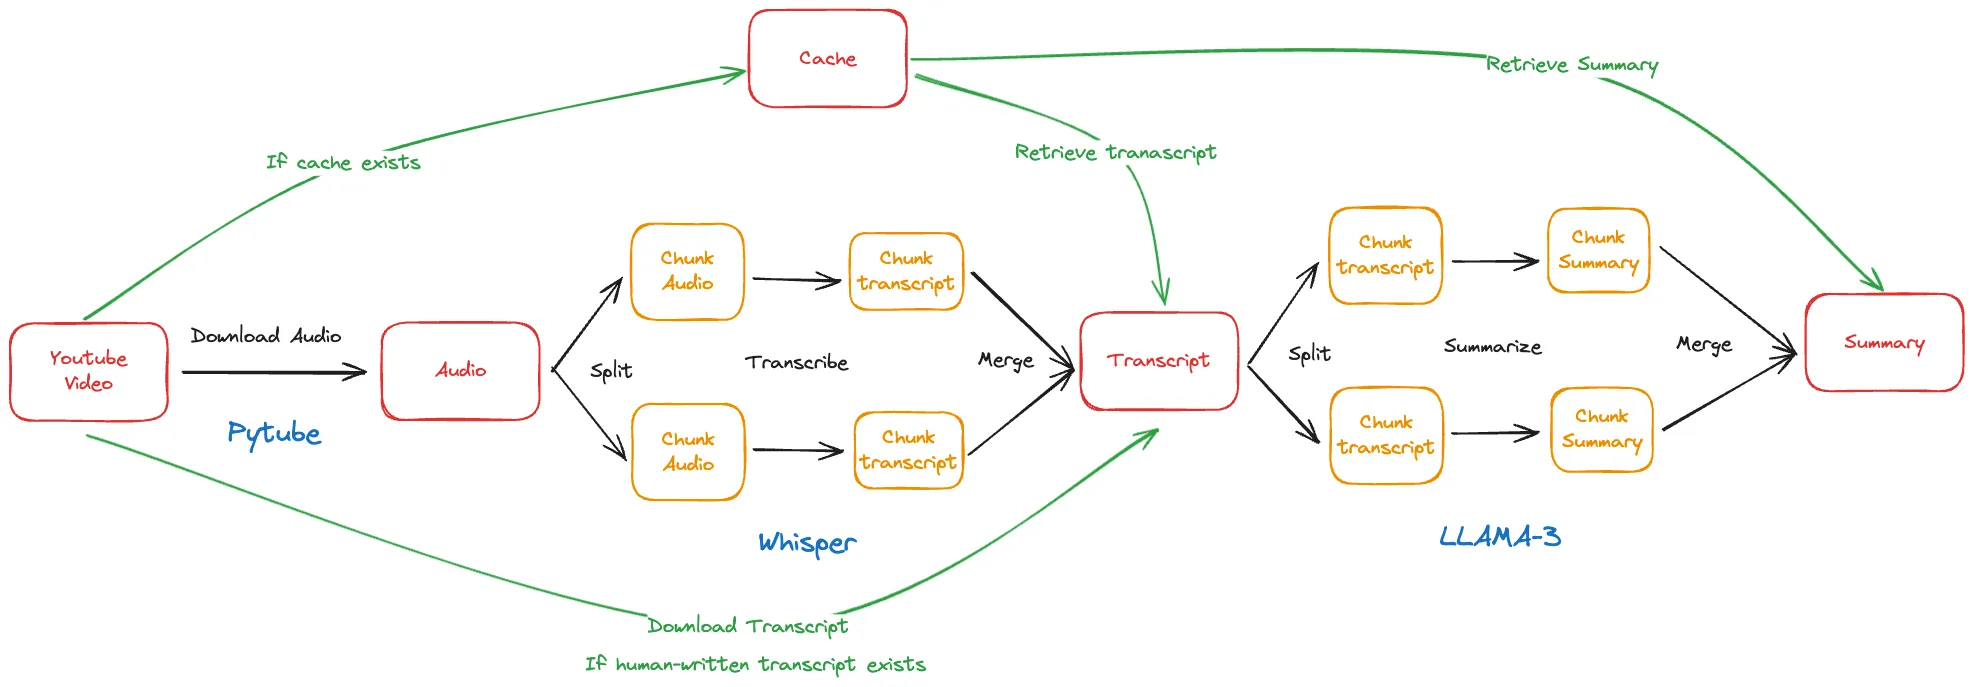
Chunking & Parallel Processing
Our current pipeline works well for short- and medium-length videos, but performance degrades on very long videos, say over an hour long. The issue is that our key models, Whisper for transcription and LLAMA-3 for summarization, process their inputs sequentially.
Specifically, these models are autoregressive, meaning they generate their output one token (roughly a word piece) at a time, and each next token depends on all the previous tokens. This makes them very slow on long input sequences. Transcribing and summarizing a 2-hour video end-to-end with this approach could take hours!
To handle arbitrarily long videos, we need to split up the work into manageable chunks that can be processed in parallel. For example, we can split the input audio into 5-minute segments, transcribe each chunk independently, then combine the chunk transcripts into a full transcript at the end. We can similarly chunk the full transcript into pieces for summarization.
The chunking does add some overhead to split up and recombine the data, but this cost is far outweighed by the huge gains from parallel processing. We can spin up as many chunk processing jobs as we have cores on our machine, scaling the throughput nearly linearly with compute.
Here’s an updated diagram showing the chunking and parallel processing flow:
With these optimizations for skipping redundant work, caching repeated requests, and parallelizing long videos, our YouTube video summarizer is ready to handle just about any video users can throw at it! Let’s see how it comes together in code.
Implementing the Solution
Project Structure
Now let’s get started with the implementation ! We’ll use FastAPI for the API layer, Whisper for transcription, and LLAMA-3 via Anthropic’s API for summarization. Here’s the high-level code structure:
└>ytb-summarizer
  ├>src
  │ ├>prompts
  │ │ ├─summarizer_prompts.py
  │ │ └─__init__.py
  │ ├─app.py
  │ ├─audio_transcriber.py
  │ ├─download_model.py
  │ ├─transcript_summarizer.py
  │ ├─video_downloader.py
  │ └─__init__.py
  ├>tests
  │ ├─test_audio_transcriber.py
  │ ├─test_transcript_summarizer.py
  │ ├─test_video_downloader.py
  │ └─__init__.py
  ├─docker-compose.yml
  ├─Dockerfile
  ├─requirements.txt
  └─.env
The key components are:
main.py: Configures the FastAPI endpoint for receiving video URLs and returning summaries.video_loader.py: Handles downloading of video metadata, audio, and transcripts using PyTube.transcriber.py: Performs audio transcription using Whisper.summarizer.py: Generates summaries of transcripts using LLAMA-3.
Setting Up the Development Environment
Before diving into the code, let’s set up our Python development environment. We’ll be using Python 3.11 and a number of libraries for different parts of the project - Gradio for the web UI, FastAPI for the backend API, PyTube for fetching YouTube data, Whisper for transcription, and more.
It’s good practice to create a virtual environment for each project to keep the dependencies isolated. We can use Python’s built-in venv module to do this.
First, create a requirements.txt file in the project root directory and add the following lines to specify the libraries and versions we’ll be using:
groq==0.5.0
fastapi==0.110.2
gradio==4.28.1
pydantic==2.7.1
uvicorn==0.29.0
gunicorn==22.0.0
pytube==15.0.0
youtube-transcript-api==0.6.2
faster-whisper==1.0.1
assemblyai==0.26.0
redis==5.0.4
json-repair==0.15.5
We’re pinning the versions to ensure compatibility and reproducibility, since we know these versions work well together.
Now open a terminal, navigate to the project directory, and run the following commands:
python -m venv venv
source venv/bin/activate
pip install -r requirements.txt
This creates a new virtual environment in a folder called venv, activates it (putting its Python interpreter first in your PATH), and installs all the libraries listed in requirements.txt.
We’re now ready to start writing some code! I recommend using VSCode as an IDE, with the Python extension installed. To select the virtual environment we just created, open the Command Palette with Cmd+Shift+P, start typing “Python: Select Interpreter”, and choose the one that points to ./venv/bin/python.
Building the Web Interface with Gradio
For the web interface, we’ll use Gradio, which is a great library for quickly building demo UIs for machine learning models. It provides a simple way to hook up UI components to functions and handles a lot of the boilerplate.
Create a new file app.py in the src directory and add the following code:
import gradio as gr
from fastapi import FastAPI

async def summarize(url):
	pass

def gradio_app(use_queue=True):

	url = gr.Textbox(
		label="Enter the YouTube URL",
		placeholder="https://www.youtube.com/watch?v=..."
	)

	output = gr.Markdown()

	interface = gr.Interface(
		fn=summarize,
		inputs=url,
		outputs=output,
		title="YouTube Video Summarizer",
		description="Enter a YouTube URL to summarize the video.",
		allow_flagging="never",
		css="footer {display: none !important}",
	)

	if use_queue:
		interface.queue(default_concurrency_limit=None)

	return interface


app = FastAPI()

app = gr.mount_gradio_app(app, gradio_app(), path="/gradio")

if __name__ == "__main__":
	import uvicorn
	uvicorn.run(app, host="0.0.0.0", port=8000)
This code does a few key things:
- Defines a Gradio
Interfacewith a text input for the YouTube URL, a markdown output for the summary, and some additional customization options. - Specifies that the
summarizefunction (which we’ll implement next) should be called with the URL input and its output should be displayed in the output component. - Enables queuing, which makes the interface more responsive for multiple concurrent requests.
- Creates a FastAPI app and mounts the Gradio app on the
/gradioendpoint. This lets us use FastAPI features like API documentation and authentication if needed. - Runs the FastAPI app with uvicorn when the script is run directly.
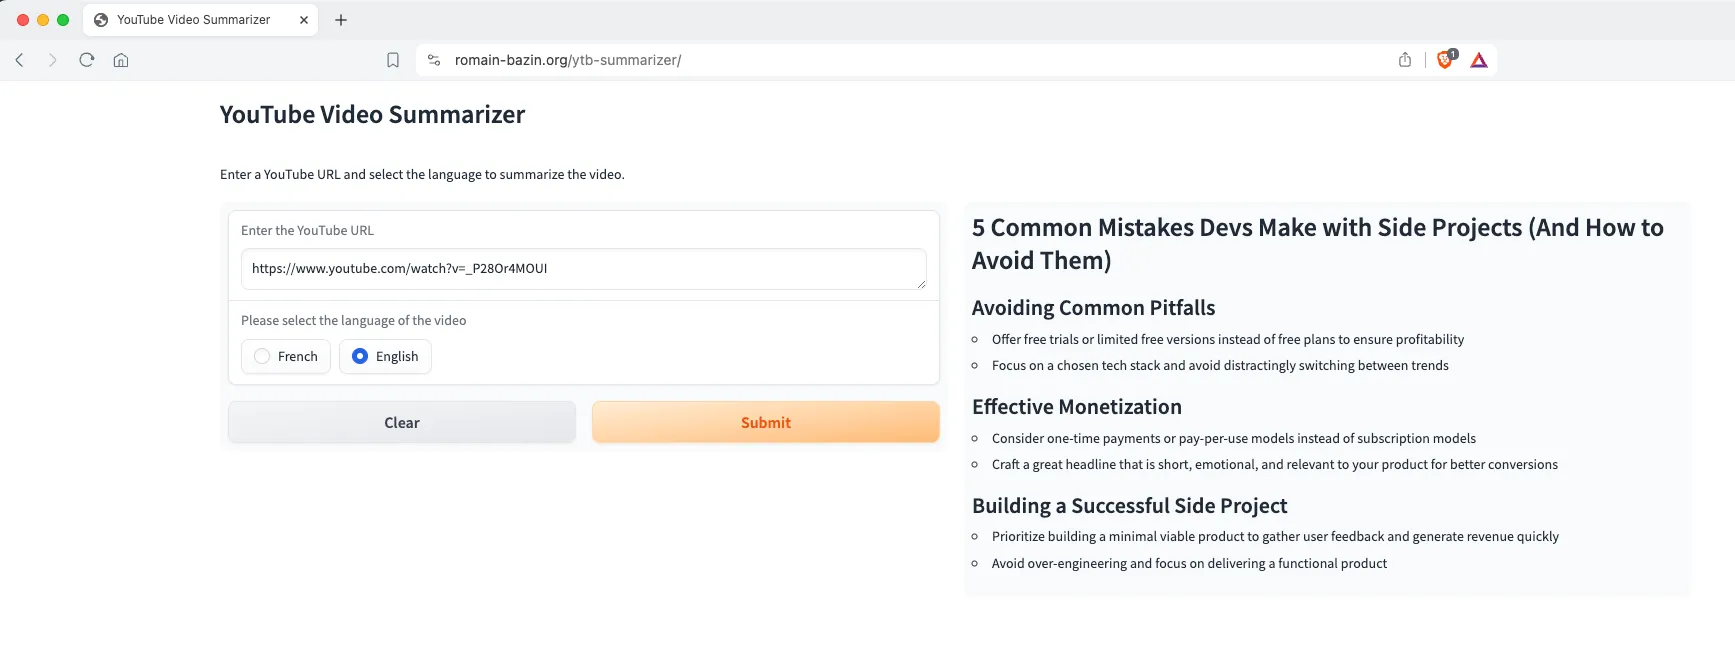
To see the interface, run python app.py in the terminal and navigate to http://localhost:8000/gradio in a web browser. You should see something like this:
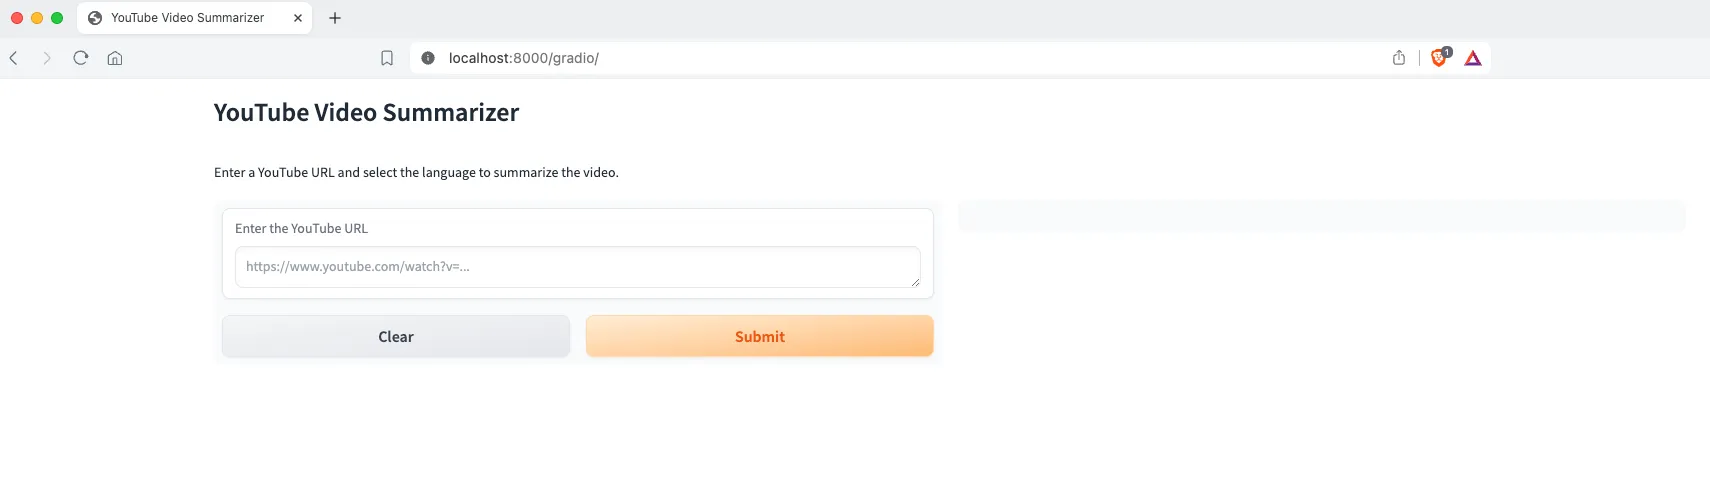
Right now the “Submit” button won’t do anything because we haven’t implemented the summarize function yet. That’s what we’ll tackle next, building out the core logic to fetch video data, transcribe the audio, generate a summary, and display it to the user.
Implementing the Core Summarization Logic
With the web interface set up, let’s now dive into the core logic of the application in the summarize function. This function orchestrates all the key steps in the summarization pipeline:
- Validating the input YouTube URL
- Checking for cached transcript or summary to avoid redundant work
- Downloading the video and transcribing the audio
- Generating a summary of the transcript
- Caching the transcript and summary for future requests
- Returning the summary to the user
Here’s the implementation of the summarize function in app.py:
from redis.asyncio import Redis

from video_downloader import AsyncVideoDownloader
from transcript_summarizer import AsyncTranscriptSummarizer

downloader = AsyncVideoDownloader()
summarizer = AsyncTranscriptSummarizer()
redis_client = Redis(host="redis-ytb-summarizer", port=6379, db=0)

def validate_request(url):
    if not url.startswith("https://www.youtube.com/"):
        return False
    return True

async def summarize(url):

	start = time()

	if not validate_request(url):
		raise gr.Error("Invalid YouTube URL. Please enter a valid YouTube URL.")

	video_id = await downloader.get_video_id(url)

	cached_summary = await redis_client.get(f"{video_id}_summary")
	if cached_summary:
		print("Cached summary retrieved")
		return cached_summary.decode("utf-8")

	cached_transcript = await redis_client.get(f"{video_id}_transcript")
	if cached_transcript:
		transcript = cached_transcript.decode("utf-8")
		print("Cached transcript retrieved")
	else:
		try:
			transcript = await downloader.get_transcript(url, "en")
			await redis_client.set(f"{video_id}_transcript", transcript)
		except Exception:
			raise gr.Error(f"An error occurred while fetching or generating the transcript of the video.")
	try:
		summary = await summarizer.summarize(transcript)
		await redis_client.set(f"{video_id}_summary", summary)
	except Exception:
		raise gr.Error(f"An error occurred while summarizing the transcript of the video.")

	end = time()

	print(f"Total time to process the request: {end - start:.2f}s")

	return summary
Let’s walk through this step-by-step:
- We first validate that the input
urlis indeed a YouTube URL. This is a basic check to avoid wasting time on invalid inputs. - We extract the unique
video_idfrom the URL. This will be used as a key for caching. - We check Redis to see if we already have a cached summary for this video. If so, we return it immediately, avoiding all the download, transcription, and summarization work.
- If there’s no cached summary, we check for a cached transcript. If found, we can skip the video download and transcription steps.
- If there’s no cached transcript, we use the
AsyncVideoDownloaderto fetch the transcript (more on this class later). This may involve downloading the video and running speech recognition if there are no pre-existing captions. We cache the transcript in Redis for future requests. - With the transcript in hand, we use the
AsyncTranscriptSummarizerto generate a summary. This likely involves chunking the text, making multiple API calls to a summarization model, and stitching the results back together (more on this later too). - We cache the summary in Redis for future requests for the same video.
- Finally, we return the summary to be displayed to the user.
Throughout this process, we wrap key steps in try/except blocks to catch and surface errors to the user in a friendly way via Gradio. This helps make the application more robust.
You’ll notice we’re using asynchronous versions of the downloader and summarizer classes. This is to take advantage of asynchronous I/O for better performance.
Asynchronous programming in Python allows us to efficiently handle multiple requests even when much of the processing time is spent waiting on I/O bound tasks like downloading videos, making API requests for transcription and summarization, and querying the Redis cache.
While one request is waiting on a video download or API response, the async framework can switch to processing another request, maximizing utilization of the CPU. This enables our application to handle many concurrent users even on a single server.
With the core summarize function in place, let’s now implement the AsyncVideoDownloader and AsyncTranscriptSummarizer classes to fill in the key functionality.
The Video Downloader Component
To generate a summary of a YouTube video, the first step is to obtain the video’s transcript. This is the job of the AsyncVideoDownloader class in our system.
The downloader is responsible for:
- Fetching the video’s metadata (e.g., video ID)
- Checking for an existing human-created transcript
- If no human transcript is found, downloading the video’s audio and transcribing it
- Saving the transcript for future use
Here’s the implementation in video_downloader.py:
from pytube import YouTube
from youtube_transcript_api import YouTubeTranscriptApi
from youtube_transcript_api._errors import NoTranscriptFound

import os
import aiofiles

from src.audio_transcriber import (
	AsyncAudioTranscriber,
	AsyncAssemblyAITranscriber,
)

class AsyncVideoDownloader:
    """
    An asynchronous class that handles downloading video transcripts and audio from YouTube.

    Attributes:
        transcript_dir (str): The directory to save downloaded transcripts.
        audio_dir (str): The directory to save downloaded audio files.
    """

    def __init__(self, transcript_dir="transcripts", audio_dir="audio"):
        self.transcriber: AsyncAudioTranscriber = AsyncAssemblyAITranscriber()
        self.transcript_dir = transcript_dir
        self.audio_dir = audio_dir
        os.makedirs(self.transcript_dir, exist_ok=True)
        os.makedirs(self.audio_dir, exist_ok=True)

    async def get_transcript(self, video_url, language = "en"):
        """
        Downloads the transcript or audio for a given YouTube video asynchronously.

        Args:
            video_url (str): The URL of the YouTube video.
            language (str): The language of the transcript to download.

        Returns:
            None
        """
        video_id = await self.get_video_id(video_url)
        transcript = await self._download_transcript(video_id, language)

        if transcript:
            print(f"Human transcript downloaded for video: {video_id}")
            transcript = "".join(obj["text"] for obj in transcript)
        else:
            audio_file = await self._download_audio(video_url)
            print(f"Audio downloaded for video: {video_id}")
            print("Transcribing audio...")
            transcript = await self._transcribe_audio(audio_file, language)
            print("Transcription complete.")
            os.remove(audio_file)
            print("Audio file deleted.")

        await self._save_transcript(transcript, video_id, language)
        print(f"Transcript saved for video: {video_id}")
        return transcript

    async def get_video_id(self, video_url):
        """
        Extracts the video ID from a YouTube video URL.

        Args:
            video_url (str): The URL of the YouTube video.

        Returns:
            str: The video ID.
        """
        return YouTube(video_url).video_id

    async def _download_transcript(self, video_id, language = "en"):
        """
        Downloads the transcript for a given YouTube video.

        Args:
            video_id (str): The ID of the YouTube video.
            language (str): The language of the transcript to download.

        Returns:
            str or None: The downloaded transcript, or None if not available.
        """
        transcript_list = YouTubeTranscriptApi.list_transcripts(video_id)
        try:
            transcript = transcript_list.find_manually_created_transcript([language])
        except NoTranscriptFound:
            return None
        return transcript.fetch() if transcript else None

    async def _download_audio(self, video_url):
        """
        Downloads the audio for a given YouTube video asynchronously.

        Args:
            video_url (str): The URL of the YouTube video.

        Returns:
            str: The path to the downloaded audio file.
        """
        youtube = YouTube(video_url)
        audio_stream = youtube.streams.filter(only_audio=True).first()
        audio_path = audio_stream.download(output_path=self.audio_dir)
        return audio_path

    async def _save_transcript(self, transcript, video_id, language = "en") -> str:
        """
        Saves the transcript to a file asynchronously.

        Args:
            transcript (str): The transcript to save.
            video_id (str): The ID of the YouTube video.
            language (str): The language of the transcript.

        Returns:
            str: The path to the saved transcript file.
        """
        filename = f"{video_id}_{language}.txt"
        filepath = os.path.join(self.transcript_dir, filename)

        async with aiofiles.open(filepath, "w", encoding="utf-8") as file:
            await file.write(transcript)

        return str(filepath)

    async def _transcribe_audio(self, audio_file, language = "en"):
        """
        Transcribes the audio file asynchronously.

        Args:
            audio_file (str): The path to the audio file.

        Returns:
            str: The transcribed text.
        """
        return await self.transcriber.transcribe(audio_file, language)
The key method here is get_transcript, which orchestrates the process of obtaining a video’s transcript. It first attempts to fetch an existing human-created transcript using the _download_transcript method, which leverages the youtube_transcript_api library.
If a human transcript is found, it is returned immediately. This is the preferred outcome, as human-created transcripts are usually of higher quality than automated ones.
If no human transcript is available, the downloader falls back to using the _download_audio method to fetch the audio stream of the video using pytube. It then passes the audio to the _transcribe_audio method, which uses an AsyncAudioTranscriber (in this case AssemblyAITranscriber) to transcribe the speech to text.
The choice of AssemblyAITranscriber here is just an example - you could swap in any transcription service or model, such as Google Speech-to-Text, AWS Transcribe, or an open-source model like Whisper. The key point is that the AsyncVideoDownloader is agnostic to the specific transcription implementation - it just needs a transcriber that implements the AsyncAudioTranscriber interface.
Once a transcript is obtained, either from existing captions or from audio transcription, it is saved to disk using the _save_transcript method. This uses the aiofiles library to enable asynchronous file I/O, which is more efficient than blocking I/O when handling multiple concurrent requests.
The saved transcripts are stored in separate directories for easier management and can be cached by the application to avoid redundant work for popular videos.
In summary, the AsyncVideoDownloader class encapsulates the logic for fetching video transcripts, either from existing captions or by downloading and transcribing the audio. It is designed to be asynchronous and modular, allowing for different transcription backends to be plugged in.
In the next section, we’ll take a closer look at the AsyncAudioTranscriber interface and the specific AssemblyAITranscriber implementation.
Flexible Transcription with the AsyncAudioTranscriber Interface
In the previous section, we saw how the AsyncVideoDownloader fetches video transcripts, falling back to downloading and transcribing the audio if no human-created captions are available. But how exactly does this audio transcription work?
To make our application flexible and adaptable to different environments and requirements, we define an AsyncAudioTranscriber interface that encapsulates the transcription process. This allows us to swap in different implementations, whether it’s a local model running on our own hardware or a cloud-based API service.
Here’s the definition of the AsyncAudioTranscriber abstract base class:
class AsyncAudioTranscriber(ABC):
    """
    A class for transcribing audio files asynchronously.

    This class provides an abstract interface for transcribing audio files
    in different languages asynchronously.

    Attributes:
        None

    Methods:
        transcribe: Transcribes an audio file asynchronously.

    """

    @abstractmethod
    def __init__(self):
        pass

    @abstractmethod
    async def transcribe(
        self, audio_file: str
    ) -> str:
        """
        Transcribes an audio file asynchronously.

        Args:
            audio_file (str): The path to the audio file.

        Returns:
            str: The transcribed text.
        """
        pass
“
The key method here is transcribe, which takes an audio file path and a language code and returns the transcribed text asynchronously. The asynchronous design allows the application to handle multiple transcription requests concurrently without blocking, improving overall throughput.
With this interface defined, we can now provide different implementations tailored to specific needs. Let’s look at two examples: a local transcriber using the Whisper model, and a cloud-based transcriber using the AssemblyAI API.
Local Transcription with Whisper
For environments where sending audio data to external services is not feasible due to security, privacy, or connectivity constraints, running a transcription model locally can be a good option.
Here’s an implementation of AsyncAudioTranscriber using the popular open-source Whisper model:
class AynscWhisperTranscriber(AsyncAudioTranscriber):
    """
    An asynchronous class for transcribing audio files using the Whisper model.

    Attributes:
        model_name (str): The name of the Whisper model to use for transcription.
        cpu_threads (int): Number of threads to use when running on CPU (4 by default). A non zero value overrides the OMP_NUM_THREADS environment variable.
        num_workers (int): When transcribe() is called from multiple Python threads, having multiple workers enables true parallelism when running the model (concurrent calls to self.model.generate() will run in parallel). This can improve the global throughput at the cost of increased memory
    """

    def __init__(self):
        self.model_name = os.getenv("TRANSCRIBER_MODEL_NAME", "base")
        self.cpu_threads = 0
        self.num_workers = 1

        self.transcriber = WhisperModel(
            self.model_name,
            device="cpu",
            cpu_threads=self.cpu_threads,
            num_workers=self.num_workers,
            compute_type="int8",
        )

    async def transcribe(
        self, audio_file: str
    ) -> str:
        """
        Transcribes an audio file asynchronously.

        Args:
            audio_file (str): The path to the audio file.

        Returns:
            str: The transcribed text.
        """
        start = time()
        loop = asyncio.get_running_loop()
        with ProcessPoolExecutor() as executor:
            text = await loop.run_in_executor(
                executor, transcribe_audio, self.transcriber, audio_file, "en"
            )
        end = time()
        print(f"Time to transcribe audio: {end - start:.2f}s")

        return text.strip()
This implementation uses the WhisperModel class from the faster-whisper library, which provides a convenient interface to the Whisper model. We configure the model to run on CPU using int8 quantization for memory efficiency, and use a ProcessPoolExecutor to run the transcription asynchronously.
The specific model used is configurable via the TRANSCRIBER_MODEL_NAME environment variable, defaulting to the “base” model which provides a good balance of speed and accuracy. Larger models like “large” or “large-v2” can provide higher accuracy but are slower and more memory-intensive.
Cloud Transcription with AssemblyAI
For applications that require maximum scalability and minimal infrastructure management, using a cloud-based transcription API can be a great option. One such service is AssemblyAI, which offers a simple REST API for audio transcription.
Here’s an implementation of AsyncAudioTranscriber using the AssemblyAI API:
class AsyncAssemblyAITranscriber(AsyncAudioTranscriber):
    """
    An asynchronous class for transcribing audio files using the AssemblyAI API.

    Attributes:
        api_key (str): The AssemblyAI API key.
        client (assemblyai.Client): The AssemblyAI client.
    """

    def __init__(self):
        self.api_key = os.getenv("ASSEMBLYAI_API_KEY", None)
        assert (
            self.api_key is not None
        ), "ASSEMBLYAI_API_KEY environment variable is not set"

        aai.settings.api_key = self.api_key
        self.transcriber = aai.Transcriber()

    async def transcribe(
        self, audio_file: str
    ) -> str:
        """
        Transcribes an audio file asynchronously.

        Args:
            audio_file (str): The path to the audio file.

        Returns:
            str: The transcribed text.
        """
        config = aai.TranscriptionConfig(
            language_code="en", punctuate=True, format_text=True
        )

        start = time()
        future = self.transcriber.transcribe_async(audio_file, config=config)
        asyncio_future = asyncio.wrap_future(future)
        transcript = await asyncio_future
        end = time()
        print(f"Time to transcribe audio: {end - start:.2f}s")

        if transcript.status == aai.TranscriptStatus.error:
            raise Exception(f"Transcription failed with error: {transcript.error}")

        return transcript.text.strip()
This implementation uses the assemblyai Python library to interface with the AssemblyAI API. The API key is read from the ASSEMBLYAI_API_KEY environment variable, and a Transcriber object is initialized with this key.
To perform a transcription, we create a TranscriptionConfig specifying the language code and some formatting options, then call the transcribe_async method with this configuration. This returns a Future object, which we convert to an asyncio future using asyncio.wrap_future to seamlessly integrate with our application’s async event loop.
One great feature of AssemblyAI is that they offer 100 hours of free audio transcription per month, making it an excellent choice for getting started or for applications with moderate transcription volumes. For high-volume applications, their pricing is competitive with other cloud transcription services.
Choosing a Transcription Implementation
So which AsyncAudioTranscriber implementation should you choose for your application? The answer depends on your specific requirements and constraints.
If you’re dealing with sensitive data that can’t be sent to third-party services, or if you need to be able to transcribe audio without an internet connection, the AsyncWhisperTranscriber running locally is a good choice. Keep in mind that you’ll need sufficient compute resources (CPU and RAM) to run the model, especially for longer audio files.
If your priority is simplicity, scalability, and time-to-market, the AsyncAssemblyAITranscriber using the cloud API is a great option. You don’t need to manage any infrastructure, and you can take advantage of AssemblyAI’s highly optimized models and servers. The free tier also makes it easy to get started without upfront costs.
Of course, these are just two examples - the beauty of the AsyncAudioTranscriber interface is that you can easily add new implementations tailored to your specific needs, whether it’s using a different local model like DeepSpeech or integrating with another cloud service like Google Speech-to-Text.
In the next section, we’ll see how the AsyncTranscriptSummarizer class uses a similar pattern to enable flexible choices for the summarization step of the pipeline.
Summarizing Transcripts with a Large Language Model
With the video transcripts in hand, the next step in our pipeline is to generate concise summaries capturing the key points of the video. This is where we’ll leverage the power of large language models (LLMs).
LLMs are AI models trained on vast amounts of text data, which gives them the ability to understand and generate human-like text. By providing an LLM with a transcript and asking it to summarize the content, we can get a condensed version that captures the main ideas in a more digestible form.
For our application, we’ll use the Llama-3 model provided by the Groq API. Llama-3 is a powerful LLM that excels at tasks like summarization.
Here’s the implementation of our AsyncTranscriptSummarizer class that handles this process:
class AsyncTranscriptSummarizer:
    """
    A class for summarizing long YouTube video transcriptions asynchronously using calls to large language model APIs.
    """

    def __init__(self, max_chunk_size=1000):
        """
        Initialize the TranscriptSummarizer.

        Args:
            api_key (str): The API key required for authentication with the language model API.
            api_url (str): The URL of the language model API endpoint for summarization.
            max_chunk_size (int, optional): The maximum size of each chunk in characters. Default is 1000.
        """
        self.api_key = os.getenv("GROQ_API_KEY", None)
        assert self.api_key, "GROQ_API_KEY environment variable is not set"
        self.client = AsyncGroq(
            api_key=self.api_key,
        )
        self.model_name = os.getenv("SUMMARIZER_MODEL_NAME", "llama3-8b-8192")
        self.max_chunk_size = max_chunk_size
        self.max_tokens = 8000
In the constructor, we initialize the Groq API client with our API key (loaded from an environment variable) and set some default parameters like the model name (llama3-8b-8192) and the maximum number of tokens to generate (max_tokens).
The key method in this class is summarize, which takes a full video transcript and returns a summary:
async def summarize(self, transcript: str, language) -> str:
    """
    Summarize the entire transcript by splitting it into chunks, summarizing each chunk, and combining the summaries.

    Args:
        transcript (str): The full transcript text to be summarized.

    Returns:
        str: The final summary of the entire transcript.
    """
    print("Summarizing the transcript")

    chunks = await self.split_in_chunks(transcript)

    print(f"Summarizing {len(chunks)} chunks separately")
    chunk_coroutines = [
        self.summarize_chunk(chunk, language) for chunk in chunks
    ]
    summaries = await asyncio.gather(*chunk_coroutines)

    print("Merging the summaries chunks into ")
    final_summary = await self.merge_summaries(summaries)

    return final_summary
This method does the following:
- Splits the transcript into smaller chunks using the
split_in_chunksmethod. This is necessary because LLMs have a limit on the amount of text they can process in a single request (determined by themax_tokensparameter). By breaking the transcript into chunks, we can summarize each part separately and then combine the results. - Concurrently sends each chunk to the
summarize_chunkmethod for summarization. This is where the actual API call to the Llama-3 model happens. We useasyncio.gatherto run these requests concurrently, which improves performance. - Combines the chunk summaries into a single overall summary using the
merge_summariesmethod. This involves another API call to the LLM, asking it to consolidate the individual summaries into a coherent whole.
Let’s take a closer look at the summarize_chunk method:
async def summarize_chunk(self, chunk: str, language) -> str:
    """
    Summarize a chunk of the transcript using the language model API.

    Args:
        chunk (str): A chunk of the transcript text to be summarized.

    Returns:
        str: The summary of the given chunk.

    Raises:
        requests.exceptions.RequestException: If there is an error with the API request.
    """
    try:
        chat_completion = await self.client.chat.completions.create(
            messages=[
                {
                    "role": "system",
                    "content": CHUNK_SUMMARIZER_PROMPT,
                },
                {
                    "role": "user",
                    "content": "<chunk>\n\n" + chunk + "\n\n</chunk>",
                },
            ],
            model=self.model_name,
            max_tokens=self.max_tokens,
            response_format={"type": "json_object"},
        )
        print(chat_completion.choices[0].message.content)
        response = ResponseModel.model_validate_json(
            chat_completion.choices[0].message.content
        )
    except BadRequestError as e:
        repaired_json_dict = repair_json(
            e.body["error"]["failed_generation"], return_objects=True
        )
        response = ResponseModel.model_validate(repaired_json_dict)
    except ValidationError:
        repaired_json_dict = repair_json(
            chat_completion.choices[0].message.content, return_objects=True
        )
        response = ResponseModel.model_validate(repaired_json_dict)

    return response.summary
Here’s what’s happening:
- We construct a “chat” request to the Groq API, which consists of a series of messages. The first message has a “system” role and contains a prompt instructing the model to summarize the given text. This prompt is defined in the
CHUNK_SUMMARIZER_PROMPTvariable (detailed in the next section). - The second message has a “user” role and contains the actual chunk of transcript text to be summarized, wrapped in
<chunk>tags. - We send this request to the API, specifying the model to use (
self.model_name), the maximum number of tokens to generate (self.max_tokens), and the desired response format (json_object). - The API returns a response containing the generated summary. We extract this summary from the response and print it for debugging purposes.
- We validate the response against our
ResponseModelschema (not shown here). This is a Pydantic model that defines the expected structure of the API response, including the generated summary and an optional “scratchpad” field containing the model’s intermediate work. - If there are any errors in the API request or response validation, we catch them and attempt to repair the JSON using the
json_repairlibrary.
The merge_summaries method works similarly, but instead of summarizing a single chunk, it takes the list of chunk summaries and asks the model to combine them into an overall summary.
This approach of using an LLM for summarization has several benefits:
- It can handle transcripts of arbitrary length by breaking them into chunks
- It leverages the knowledge and language understanding of a powerful pre-trained model
- It’s flexible and can be adapted to different summarization needs by modifying the prompts
However, there are also some limitations:
- The quality of the summaries depends on the quality of the transcripts and the capabilities of the specific LLM used
- There is a cost associated with each API request, which can add up for frequent usage
- The summarization process is not fully transparent or controllable, as it relies on the “black box” of the LLM
Despite these caveats, using an LLM for summarization is a powerful technique that can greatly enhance the usability and value of long video content. By condensing transcripts into key points, we can save viewers time and make the information more accessible.
In the next section, we’ll see how all these pieces - the video downloader, transcriber, and summarizer - come together in the complete application flow.
Crafting Effective Prompts for Summarization
The heart of our transcript summarization approach lies in the prompts we provide to the language model. These prompts are carefully designed to elicit concise, informative, and well-structured summaries from the LLM.
You can add these prompts in src/prompts/summarizer_prompts.py
CHUNK_SUMMARIZER_PROMPT = """Your task is to summarize the key information from a transcript chunk (an excerpt from the transcript of a YouTube video, typically 1000 words long) in the form of clear, concise bullet points and a title.

Follow these steps:

1. Carefully read the transcript chunk to identify the most important points, arguments, takeaways, and conclusions.
2. Organize the key information into a logical bullet point structure.
3. Write the summary and title, following these specifications:
    - The bullet point summary should:
        - Capture the essential information needed to understand the main points
        - Be concise yet comprehensive (aim for 4-7 bullet points, each 1-2 sentences long)
        - Maintain logical coherence
    - The title should:
        - Concisely summarize the main topic or overarching message of the chunk
        - Be 5-10 words long
    - Write in the same language as the input chunk

Provide your output in this JSON format:
<json>
{
  "scratchpad": "Your notes and thoughts for steps 1 and 2 go here.",
  "summary": "## Chunk Title\n\nBullet point 1\nBullet point 2\n...",
}
</json>

Example of desired output for a transcript chunk about the benefits of meditation:
<example_json>
{
  "scratchpad": "Key points: meditation reduces stress, anxiety, depression; improves focus, memory, emotional regulation; enhances self-awareness, well-being; short daily sessions effective. \nMain takeaway: meditation provides significant mental health and cognitive benefits.\nLogical bullet point structure: 1) Mental health benefits 2) Cognitive improvements 3) Self-awareness and well-being 4) Effective even in short sessions",
  "summary": "## The Science-Backed Benefits of Meditation\n\nMeditation can reduce stress, anxiety and depression symptoms\nRegular practice improves focus, memory and emotional regulation\nMeditation enhances self-awareness and overall well-being\nEven short daily meditation sessions of 10 minutes can provide benefits",
}
</example_json>

Note: even if your input is empty, please provide a valid JSON object with the keys "scratchpad", "summary" to maintain consistency.
Note: to generate a valid JSON object, be extra cautious to start your JSON object with `{` and end it with `}`.
Note: don't forget to write the summary in the "summary" key/value of the JSON object.
"""

SUMMARIES_MERGER_PROMPT = """Your task is to compile the individual chunk summaries from a YouTube video transcript into a coherent, well-structured, and insightful overall summary. The summary should include a main title, sub-sections with sub-titles, and informative bullet points that capture the key ideas and takeaways from the video.

Follow these steps:

1. Review all the individual chunk summaries to identify overarching themes, main arguments, and crucial conclusions.
2. Group related points together and organize them into logical sub-sections.
3. Write the comprehensive summary, following these specifications:
   - Main Title:
     - Concisely capture the central topic or main message of the entire video
     - Should be attention-grabbing and informative
     - Aim for 5-10 words
   - Sub-Sections:
     - Organize the content into logical sub-sections based on the overarching themes or main points identified
     - Each sub-section should have a clear and descriptive sub-title
     - Aim for 3-5 sub-sections, depending on the length and complexity of the video
   - Bullet Points:
     - Under each sub-section, present the key ideas, arguments, and takeaways as concise and informative bullet points
     - Ensure the bullet points capture the essential information while maintaining logical coherence within and between sub-sections
     - Aim for 3-6 bullet points per sub-section
   - Language:
     - Write in the same language as the input chunk summaries
     - Use clear, concise, and engaging language that effectively conveys the main ideas

Provide your output in this JSON format:
<json>
{
  "scratchpad": "Your notes and thoughts for steps 1 and 2 go here.",
  "summary": "# Main Title\n\n## Sub-Title 1\n- Bullet point 1\n- Bullet point 2\n...\n\n## Sub-Title 2\n- Bullet point 1\n- Bullet point 2\n...",
}
</json>

Example of desired output for a video about the benefits and techniques of meditation:
<example_json>
{
  "scratchpad": "Overarching themes: mental health benefits, cognitive improvements, self-awareness, getting started with meditation\nMain points: reduces stress/anxiety/depression, improves focus/memory/emotional regulation, enhances well-being, short sessions effective, simple techniques\nSub-sections: 1) Mental health benefits 2) Cognitive benefits 3) Meditation and self-awareness 4) Getting started",
  "summary": "# The Power of Meditation: Improve Your Mind and Well-Being\n\n## Mental Health Benefits\n- Meditation can significantly reduce symptoms of stress, anxiety, and depression\n- Regular practice helps regulate emotions and promotes a more positive mood\n- Meditation can be an effective complementary treatment for various mental health conditions\n\n## Cognitive Improvements\n- Consistent meditation practice enhances focus, attention, and memory retention\n- Meditators often experience improved problem-solving and decision-making skills\n- Meditation can help maintain cognitive function and may slow age-related cognitive decline\n\n## Meditation and Self-Awareness\n- Practicing meditation cultivates a deeper sense of self-awareness and introspection\n- Meditators often report increased emotional intelligence and better self-regulation\n- Meditation can foster a greater sense of connection and empathy towards others\n\n## Getting Started with Meditation\n- Even short daily meditation sessions of 10-15 minutes can provide significant benefits\n- Simple techniques like focusing on the breath or a mantra can be powerful starting points\n- Consistency and patience are key to establishing a sustainable meditation practice"
}
</example_json>

Note: even if your input is empty, please provide a valid JSON object with the keys "scratchpad" and "summary", and empty strings "" as values, to maintain consistency.
Note: to generate a valid JSON object, be extra cautious to start your JSON object with `{` and end it with `}`.
Note: don't forget to write the summary in the "summary" key/value of the JSON object.
"""
Let’s dive into the key aspects of these prompts and how they contribute to generating high-quality summaries.
Precise Task Definition
One of the most crucial elements of an effective prompt is a clear and specific definition of the task at hand. In our case, we have two main prompts:
- The
CHUNK_SUMMARIZER_PROMPT, which instructs the model to summarize individual chunks of the transcript into concise bullet points and a title. - The
SUMMARIES_MERGER_PROMPT, which guides the model in combining the chunk summaries into a coherent overall summary with sections and sub-bullet points.
By precisely specifying what we want the model to do in each case, we constrain its output to the format and content we’re looking for.
Step-by-Step Instructions
Another key technique we employ is breaking down the summarization task into clear, step-by-step instructions. For example, the CHUNK_SUMMARIZER_PROMPT includes these steps:
- Carefully read the transcript chunk to identify the most important points, arguments, takeaways, and conclusions.
- Organize the key information into a logical bullet point structure.
- Write the summary and title, following these specifications: […]
By providing this level of granular guidance, we help the model reason through the task in a structured way. This is a form of “Chain-of-Thought” prompting, which has been shown to improve the quality and coherence of LLM outputs on complex tasks.
Structured Output Format
To make it easier to process and display the model’s outputs, we specify a clear output format using JSON. For instance, the CHUNK_SUMMARIZER_PROMPT asks for the output in this structure:
{
  "scratchpad": "Your notes and thoughts for steps 1 and 2 go here.",
  "summary": "## Chunk Title\n\nBullet point 1\nBullet point 2\n...",
}
Using a structured format like JSON makes it simple for our application to extract the relevant parts of the model’s response and render them in our user interface. The “scratchpad” field also gives us a window into the model’s intermediate reasoning steps, which can be useful for debugging and analysis.
Illustrative Examples
One of the most effective ways to communicate what we want from the model is to show it examples of the desired output. This technique is called few-shots prompting. In both the CHUNK_SUMMARIZER_PROMPT and SUMMARIES_MERGER_PROMPT, we include concrete examples of well-formatted summaries.
By providing these examples, we give the model a clear template to follow and a high bar to aim for in its own outputs. We’ve found that the quality and consistency of the model’s summaries are significantly improved by including these illustrative examples in the prompts.
Handling Edge Cases
Finally, we include some additional notes at the end of each prompt to handle potential edge cases and ensure consistent behavior. For example:
Note: even if your input is empty, please provide a valid JSON object with the keys “scratchpad”, “summary” to maintain consistency.
Note: to generate a valid JSON object, be extra cautious to start your JSON object with
{and end it with}.
Note: don’t forget to write the summary in the “summary” key/value of the JSON object.
These notes help ensure that the model’s output is always parseable and usable by our application, even if something unexpected happens with the input or the model’s processing.
By carefully designing these prompts with precise instructions, structured output, illustrative examples, and edge case handling, we can coax impressive summarization capabilities out of the language model. The CHUNK_SUMMARIZER_PROMPT and SUMMARIES_MERGER_PROMPT are the result of extensive iteration and testing to find the prompt patterns that yield the best results.
Of course, prompt engineering is still somewhat of an art, and there’s always room for further experimentation and refinement. If you see other best practices to include, or if you want to change the style of the summaries generated, the prompts are what you should modify !
The Importance of Testing Your Code
When you’re excited about a new project idea, it’s tempting to dive straight into writing code and building features. However, there’s one crucial step that’s often overlooked, especially in smaller projects: testing your code.
Writing tests for your functions and classes might seem like tedious extra work, but it pays off enormously in the long run. Tests are like a safety net that ensure your code is working as expected, and that any changes you make don’t introduce new bugs.
Here are just a few of the key benefits of having a good test suite:
- Catch bugs early: Tests help you identify and fix bugs before they make it into production, where they could cause real problems for your users. Catching bugs early saves time and frustration down the line.
- Ensure code quality: Writing tests forces you to think about edge cases, error handling, and the expected behavior of your code. This process naturally leads to higher-quality, more robust code.
- Enable refactoring: As your codebase grows, you’ll inevitably need to refactor and make changes. Having a solid set of tests gives you the confidence to refactor without fear of breaking existing functionality.
- Serve as documentation: Well-written tests serve as a form of executable documentation, illustrating how your code is intended to be used and what it’s expected to do. This can be invaluable for other developers (or your future self) trying to understand your code.
- Speed up development: While it might seem counterintuitive, having tests can actually speed up your development process in the long run. By catching bugs early and providing a safety net for changes, tests enable you to move faster with confidence.
In larger projects and production environments, testing becomes even more critical. Automated testing pipelines and continuous integration/continuous deployment (CI/CD) practices rely on having a comprehensive suite of tests to ensure that code changes are safe to deploy.
A common convention is to have one test file for each file in your project’s source directory. For example, if you have a src/process.py file, you would have a corresponding tests/test_process.py file containing tests for the functions in process.py. This organization keeps your tests close to the code they’re testing and makes it easy to find and update tests as your code evolves.
Now, you might be thinking: “This all sounds great, but writing tests seems like a lot of extra work!“. And it’s true, writing good tests does require effort and discipline. But the long-term benefits are more than worth it. Skipping tests to save time in the short term is a bit like not bothering to put on your seatbelt because it takes a few extra seconds. It might not seem like a big deal… until something goes wrong.
So, while it might be tempting to skip tests for a small, personal project like our YouTube summarizer, I’d encourage you to view it as an opportunity to build good habits and hone your testing skills. Start small, perhaps just writing a few key tests for the most critical parts of your code. As you see the benefits and get more comfortable with testing, you can gradually expand your test coverage.
Remember, even the most experienced developers write bugs sometimes. Having tests is like having a pet AI that tirelessly double-checks your work and alerts you when something seems off. And who wouldn’t want one of those watching their back?
So go forth and write some tests! Your future self (and your users) will thank you.
Streamlining Deployment with Docker and Docker Compose
Congratulations, you’ve built a powerful YouTube summarizer application! But how do you actually deploy it and share it with the world? That’s where containerization comes in.
Why Containerization Matters
Imagine you’ve poured your heart and soul into coding an application on your trusty laptop. It works perfectly on your machine, so you excitedly send the code to a friend… only to hear back that they can’t get it to run. Cue the frustration and frantic back-and-forth troubleshooting.
This is where containerization tools like Docker and Docker Compose come to the rescue. They allow you to package your application, along with all its dependencies and configurations, into a portable, self-contained unit called a container. You can think of a container as a lightweight, isolated mini-computer that has everything your application needs to run.
The beauty of containers is that they run consistently across different machines and environments. Whether your application is running on your laptop, a friend’s computer, or a cloud server, if it’s containerized, it will behave the same way. No more “works on my machine” syndrome!
Defining Our Application’s Environment
To containerize our YouTube summarizer, we first need to define its environment. This includes things like the Python version, required libraries, and environment variables for API keys and model settings.
We’ll use a .env file to store our environment variables securely:
GROQ_API_KEY=""
ASSEMBLYAI_API_KEY=""
TRANSCRIBER_MODEL_NAME="distil-large-v2"
SUMMARIZER_MODEL_NAME="llama3-70b-8192"
These variables allow us to specify the API keys for the Groq and AssemblyAI services, as well as the specific models we want to use for transcription and summarization. Keeping these settings in a separate .env file makes it easy to manage and avoid accidentally committing sensitive keys to version control.
Building the Docker Image
Next, we need to create a Dockerfile that defines how to build our application’s Docker image. An image is essentially a blueprint for creating containers. Here’s what our Dockerfile looks like:
FROM python:3.11-slim

ENV PYTHONUNBUFFERED=1 \
    DEBIAN_FRONTEND=noninteractive

WORKDIR /app

COPY ./requirements.txt /app/requirements.txt

RUN pip install --upgrade pip && \
    pip install --no-cache-dir -r ./requirements.txt

COPY ./src/download_model.py /app/download_model.py

ARG TRANSCRIBER_MODEL_NAME="base"
ENV TRANSCRIBER_MODEL_NAME=${TRANSCRIBER_MODEL_NAME}
RUN python download_model.py

COPY ./src/ /app/src/
COPY ./app.py /app/app.py

RUN adduser --disabled-password --gecos '' appuser && \
    chown -R appuser:appuser /app

USER appuser
CMD ["gunicorn", "--bind", "0.0.0.0:80", "-k", "uvicorn.workers.UvicornWorker", "app:app"]
Let’s break this down:
- We start from a slim Python 3.11 base image to keep our image small and efficient.
- We set some environment variables to control Python output buffering and apt-get prompt mode.
- We set the working directory to
/appand copy in ourrequirements.txtfile. - We install the required Python packages, including upgrading pip itself.
- We copy in the script to download the transcriber model and run it, using an argument to specify the model name (defaulting to “base”).
- We copy in the rest of our application code.
- We create a non-root user to run the application, for improved security.
- We specify the command to run our FastAPI application using
GunicornandUvicornworkers.
This Dockerfile gives Docker all the instructions it needs to build an image for our application.
Orchestrating Services with Docker Compose
In addition to our main FastAPI application, our YouTube summarizer also relies on a Redis service for caching. We could start these services separately, but Docker Compose makes it much easier to manage multi-service applications.
Here’s our docker-compose.yml file:
version: '3'

services:
  ytb-summarizer:
    image: ytb-summarizer-dev:latest
    build:
      context: .
      dockerfile: Dockerfile
    container_name: ytb-summarizer
    restart: unless-stopped
    command: uvicorn app:app --reload --port 80 --host 0.0.0.0
    ports:
      - "8000:80"
    environment:
      - GROQ_API_KEY=${GROQ_API_KEY}
      - SUMMARIZER_MODEL_NAME=${SUMMARIZER_MODEL_NAME}
      - ASSEMBLYAI_API_KEY=${ASSEMBLYAI_API_KEY}
    volumes:
      - ./src/:/app/
    depends_on:
      - redis-ytb-summarizer

  redis-ytb-summarizer:
    image: redis:6.2-alpine
    container_name: redis-ytb-summarizer
    restart: unless-stopped
    command: redis-server --loglevel warning
This file defines two services: ytb-summarizer (our FastAPI application) and redis-ytb-summarizer (the Redis cache).
For the ytb-summarizer service, we specify how to build the image (referencing our Dockerfile), set environment variables (loading from .env), map the container’s port 80 to the host’s port 8000, and connect it to a custom Docker network.
The redis-ytb-summarizer service uses the official Redis image, mounts a host volume for data persistence, and connects to the same custom network.
Deploying with a Single Command
With our Dockerfile and docker-compose.yml in place, deploying our application is incredibly simple. Just run:
docker compose --project-name ytb-summarizer --up -d --buildThis command builds the Docker images (if not already built), creates the necessary containers, and starts the services in detached mode. The --project-name flag sets a name for the application stack, making it easier to manage.
Once the command completes, your YouTube summarizer application will be running and accessible at http://localhost:8000/gradio. You can test it out by pasting a YouTube video URL and watching the magic happen!
The Power of Containerization
Containerization tools like Docker and Docker Compose are game-changers for simplifying application deployment and ensuring consistency across environments. By encapsulating your application and its dependencies into portable containers, you can avoid countless hours of frustrating setup and troubleshooting.
Of course, this is just scratching the surface of what’s possible with containerization. As your applications grow more complex, you can leverage more advanced features like multi-stage builds, health checks, scaling, and orchestration with tools like Kubernetes.
But even for a simple application like our YouTube summarizer, containerization brings significant benefits in terms of portability, consistency, and ease of deployment. Give it a try in your own projects, and experience the joy of shipping applications without the usual deployment headaches!
Conclusion & Future Work
And there you have it - a fully functional YouTube video summarizer that you can use to quickly get the key points from videos without having to watch the whole thing! It’s been a great time-saver for me, and I hope you find it useful as well.
There are plenty of potential improvements and extensions to explore:
- Fine-tuning the summarization model on a dataset of video transcripts for more relevant and coherent summaries
- Adding support for additional languages and accents in the transcriber
- Allowing users to tweak model parameters like summary length and level of detail
- More robust error handling and unit testing for the API endpoints
- Adding user authentication and payments
- Building a better user interface
I had a lot of fun building this and learned a ton about LLMs, speech recognition, containerization, and API design in the process. I encourage you to try out the code and experiment with your own ideas as well!
As always, feel free to reach out with any questions or suggestions. Thanks for reading, and I hope this helps you make the most of the wealth of video content out there without sinking hours into actually watching it all!